Showing posts with label Tutorials. Show all posts

Friday, February 26, 2010

How to make a torn edge border template in Photoshop using Filters

Looking for a way to add a torn edge effect to a digital image?  


In this Step by Step tutorial, I'll will demonstrate how to create a torn edge border template in Photoshop using Quick Mask Mode and built in Photoshop Filters.
 
Note: This tutorial was made using Photoshop CS2 so if you have a later version some of the screenshots or steps might differ slightly.

CLICK ON IMAGES TO VIEW LARGER  


Steps:
 
1. To begin, open an image you want to work on.

I will use this digital collage image I made in Photoshop of a Honey Bee.


2. Under Edit > Preferences > select Grid, Guides & Preferences.

3. Under Grid section and Gridlines every: enter the distance you want between each gridline (you can use pixels or inches) I used .5 inches in this case.


4. Go to View menu > Show Grid - you will see the gridlines pop up. (Make sure that 'Snap' under the View menu is checked).


5. Then use the Rectangular Marquee tool and drag along the gridlines to make a selection. You'll notice the selection will snap to the gridlines - this way it will create an even 0.5 inch border along the edge of the photo.


6. Then click the 'Edit In Quick Mask Mode button' (as shown in the picture) on the Toolbox (or press the letter Q on the keyboard).


7.  Notice the area outside the selection appears with a red overlay. Think of it as red masking tape that is protecting the edge of the image. The edges where the mask and the unmasked area meet will be the area that will be affected when the filter is applied.


8. Let's apply the Spatter Filter to create a simple torn edge.  Select Filter > Brush Strokes > Spatter from the Main Menu Bar.


9. In the Spatter dialog box, you'll see a preview of the filter.


Adjust the Spray Radius and Smoothness of your brush to your preference by moving the sliders. For this image I selected Spray 8 and Smoothness 4.

When you're ready, click the OK button.

You'll notice the red mask has the Spatter Filter applied to it.


Note: If you want to increase the effect of the filter, press (Ctrl + F) in Windows).


11. When you've happy with the results click the 'Edit In Standard Mode button' (as shown) on the Toolbox or again press the letter Q.


You'll notice the selection with marching ants.

12. Select select [SHIFT + Ctrl + N] or then New Layer icon from the Layers Palette and create a new empty Layer above your image.

13. Then select the inverse of your selection by choosing Select > Inverse from the Main Photoshop menu or by pressing [Ctrl + Shift + I] in Windows.

14. Then select [Edit + Fill] or select [Alt + Backspace] to fill the area with color.
I choose Black in this case.

Then, select [Ctrl + D] or Select > Deselect

Lower the Opacity on the New Layer with the Black Border.  I used 50% Opacity.


16. You can use this torn edge border as a template and layer over any image!


17. Here is another example using the template and filling it with a light brown color at 100 % opacity to match the image.


In the following tutorial I'll show how to use the torn edge border template to create a Clipping Mask that you can apply and reuse for any photo.

This is my finished version applying this very same technique using a combination Photoshop Filters in Quick Mask Mode. Experiment with the Built in Photoshop Filters in Quick Mask mode to see what effects you can get.

You can see more examples in my shop here under Nature/Landscape section.

Friday, January 29, 2010

How to Digitally add Textural qualities to any photo using existing textures.


These are 8 evocative and Timeless Texture backgrounds for ACEO/ ATC Cards or Digital Collage that I first made in Photoshop to add an aged, ephemeral, or vintage quality to any photo.

Below is a simple mini-tutorial that shows how to easily apply existing textures over any photo to get interesting tinting, color, and textural effects.  This mini-tutorial was made using Photoshop but the same idea applies to software that incorporates the use of Blending Modes and Layers.


Below are 8 more original backgrounds made in Photoshop incorporating some geometric designs. 


The use of Timeless Vintage Textures is similar to the first tutorial posted above, but this one incorporates the use of Layer Masks in order to pin-point certain areas in the photo where you want to show the texture.


These textures and other digital paper designs are now available for sale for personal and commercial use at my Design Store for Arts & Crafts. 

Please stay tuned for more simple and artful Photoshop tutorials.
I hope it was useful to you. Thanks for visiting!


Saturday, November 21, 2009

DIY Tutorial for framing works on paper using an invisible V-Hinge


Here is a simple and affordable DIY tutorial that anyone can do!
For this tutorial I will be framing a 4" x 6" inch Print. 

Here are the materials you will need:


1. 11" x 14" or larger sized ready-made frame with 5" x 7" mat opening.  (Mat should be acid-free).
2. Acid-Free Mat board for mounting work if not included with Frame.
3. Exacto or utility knife
4. Gummed Linen Hinging Tape (Acid-Free)
5. Ruler or straight-edge.
6. Pencil.
7. Scissors.
8. Cardboard or cutting mat to protect cutting surface.

STEP 1:  
If the ready-made 11" x 14" frame does not include a mounting board, then cut a piece of mat board to the same size with a utility knife and a ruler. Remember to protect the cutting surface.


STEP: 2
Then take the acid-free mat board and place it facing up on top of the mounting board.


STEP 3:
Take your 4" x 6" inch print or photograph and center in inside the 5" x 7" mat opening like so.


STEP 4:  
With a pencil lightly mark the top left and top right corners on the mounting board.


STEP 5: 
Place the mat board in a safe area for now.  Then take the 4" x 6" image and turn it upside down facing you and align along the pencil marks so it is straight and parallel to the top and bottom of the mounting board.

Then flip the image so the backside is facing you. 


STEP 6:
Cut a 6 inch piece of Gummed Linen Hinging Tape and measure two 1" inch marks on the backside with the pencil.


STEP 7: 
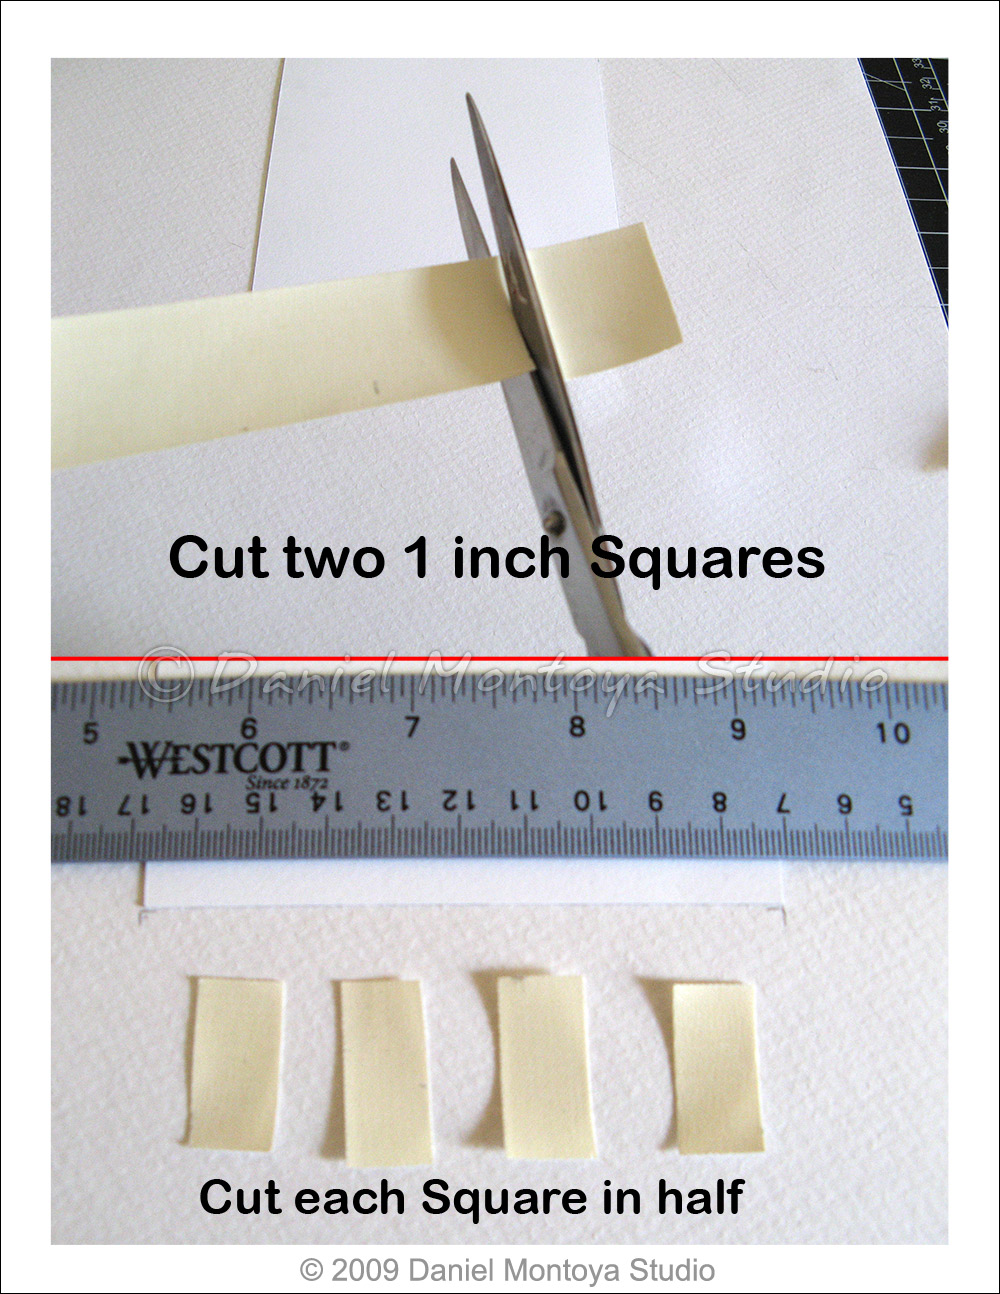
Cut along the pencil marks to get two 1" inch Squares of tape. Then, with scissors cut each of the squares in half so you have 4 pieces of tape.


STEP 8:
Apply a little water to the gummed side of the linen tape and wait until it gets sticky.  Then apply two pieces vertically 1/2 inch from the corners of the image, about 1/3 of the tape on the image and the rest on the mounting board. This attaches the image to the mounting board.

Then to reinforce the hinge apply the other two pieces of tape horizontally across the vertical pieces aligned with the edge of the image.

This creates a 2 standard T-Hinges, but since this hinge will be invisible when the image is folded over it is known as a V-Hinge.


STEP 9:
Erase any visible pencil marks with a kneaded eraser and then flip the image towards you and fold over the V-hinges.


STEP 10:
Image is shown V-hinged to the mounting board.


STEP 11: 
Then flip the mat board on its backside and place it adjacent to the mounting board like so. Cut the remaining gummed linen tape in 2 pieces and attach the mat board to the mounting board creating a hinge.  


STEP 12: 

Fold the mat board over on top of the mounting board. Your work is ready to be inserted into the frame!


STEP 13: 
Before you insert the mat board into the frame make sure that the glass is smudge and debris free. Clean the glass with a damp cloth and a little Windex and let it dry for a few minutes. Then place inside the frame and hang. Voila! That wasn't too bad.


I like this method of framing work because you can use affordable ready-made-frames and it allows the edges of the work to show.

This is useful if you have a work with small margins or you don't want a portion of the image to be hidden behind a traditional beveled mat. It also allows you to display work without the need to own a professional mat cutter to make beveled mats.

[If you want to use the traditional method which hides the T-Hinge behind the mat board, just follow the steps to create a T-Hinge, but don't turn and flip the image upside down  in STEP 5. ]

ABOUT GUMMED LINEN HINGING TAPE:

Gummed linen hinging tape is a safe, water reversible, acid-free tape with a water activated adhesive.  The adhesive dries strong and will not warp.

This is the gummed tape I used for this tutorial.

Your local Arts & Craft Store, Photography Stores, or Office Supply Store might carry this item. 

I hope that helps. If you have any other questions don't hesitate to ask. I hope you have enjoyed this tutorial and you find it helpful. Thanks for visiting!


Friday, October 9, 2009

DIY Tutorial to frame ACEOs and small works on Paper using Photo Corners

Here is a simple and affordable DIY tutorial that anyone can do!

Here are the materials you will need:


1. 5"x7", 6"x8" , 8"x10", or larger sized ready-made frame.
2. Acid-Free Mat board.
3. Exacto or utility knife.
4. Four acid-free Photo-corners.
5. Ruler or straight-edge.
6. Pencil.
7. Cardboard or mat to protect cutting surface.

Use any ready-made frame that comes with glass/plexi and cut a piece of mat board (preferably acid-free) with a utility knife to the same size opening.

My personal preference is to use inexpensive thin black frames and a light colored mat (white or beige) as it seems to match well in various home decor environments; but it's really is up to your creative personal preference.

For this tutorial I used an 8" x 10" inch frame with a beige colored mat board.

STEP 1:

On the backside of the mat board  measure 8" inches wide and 10" inches high with your ruler and draw pencil lines as cutting guides.


STEP 2:

Cut the mat board with a utility knife along the cutting guidelines using the ruler or straight edge. Remember: to use a piece of cardboard or foamboard underneath the mat board to protect the surface you will be cutting on.


STEP 3:
Take the 4 acid free photo-corners and place them snugly along the corners of your ACEO or work on paper. Using photo-corners allows one to securely display work without having to use harmful tape or glue adhesives. Also the work can be safely removed in the future.


STEP 4:

Take the mat board and mark the center on the displayable surface.

For an 8" x 10" mat board, the center would be 4 inches equidistant from the left and right sides and 5 inches equidistant from the top and bottom.

I use this technique so I can center mount the work properly on top of the mat board. If you rather just eyeball it - then this step is optional.


If for any reason the work needs to be re-centered and re-mounted on the mat board i've found you can still carefully and safely remove the photo-corners from the matboard.

STEP 5:
After you mount the work on top of the mat board it is almost ready to be inserted into the frame.


Before you insert the mat board into the 8" x 10" frame make sure that the glass is smudge and debris free. Clean the glass with a damp cloth and a little Windex and let it dry for a few minutes.

STEP 6 - FINAL STEP:
Insert the mounted work into the frame and hang on the wall. Voila!

There a unlimited ways to display art and 2D work, have fun with it!


With this technique you can mount more than one work and make interesting visual arrangements, like a diptych, triptych or create geometric shapes. Let your imagination run free. Enjoy!

ABOUT PHOTO CORNERS:
These are the photo-corners I use, made by Canson. 
You can also find a whole range of styles and colors on Amazon.

Canson Website: Here you can find retail shops near you that carry this item.

I would try to look for them in retail shops where you live first - it's not worth paying the online shipping for such an inexpensive item  - Scrapbook - Photography Stores - Arts & Crafts stores and even Office Supply Stores might carry them.

I find photo-corners are a great way to preserve cherished art, memorabilia, and photographs.

I hope that helps. If you have any other questions don't hesitate to ask. Thanks for visiting!