Welcome to my Holiday Season Giveaway and to my new Etsy Store opening for Original Digital Collage Sheets for Arts & Crafts!
I will be giving away 1 Free Original Digital Collage Sheet of your choice from my store to 3 lucky randomly drawn participants. 3 chances to win.
To Enter:
1. All you have to do is visit my Etsy Store by clicking HERE and leave a comment and a link back in this blog post letting me know which is your favorite item in my store. That's it!
Thanks for participating! You are welcome to follow my blog as well, I will reciprocate.
Entries close Christmas Day December 25th at midnight. The 3 winners will be announced next day. Good luck to all and Happy Holidays!
CONGRATULATIONS TO THE WINNERS !
Merry X-mas! The 3 lucky participants drawn by random number generator areFelicia, Enid, andAleda. Congrats to you and my appreciation to all who participated! I wish you a great New Year to come full of creative inspiration.
To the winners - I will be contacting you via email to verify the FREE digital collage sheet of your choice and where to send it.
Digital Collage Sheets are digital resources for creative people (artists, crafters, jewelry designers, etc) who love and make tangible do-it-yourself arts & crafts projects.
These carefully crafted digital high resolution (300 dpi) quality images come in a variety of themes, styles, sizes and formats and generally measure 8 ½ by 11 for ease of use and printing.
All you need is a valid email account, a computer, and an inkjet or laser printer.
They are perfect for printing on your choice of paper, fabric transfers, transparencies, vellum, parchment, self-adhesive paper, vintage and specialty papers or even cardstock!
They can be used to make an unlimited and wonderful array of arts & crafts such as mixed media collage, altered art, paper goods, bottle cap jewelry, scrabble tile pendants, domino tile pendants, microscope slide pendants, scrapbook embellishments, journaling, ATC/ ACEO cards, and they can even be matted and framed for display as a work of art.
Main Advantages:
1. PRINT MULTIPLE COPIES AS NEEDED:You can print these designs yourself over and over again! You can print them on your own inkjet or laser printer or you can take the digital file on a CD or Zip/thumb drive and go to your local superstore or hometown copy shop to have them printed.
2. NO SHIPPING CHARGES:Sending and receiving email is FREE – no waiting for the postman!
3. NO DAMAGED ITEMS:Since they are digital files – your items will arrive safely!
4. SHORT WAIT TIME:Within 24 hours your order is available for download!
5. LOW PRICE: For the price of a cup of coffee ($ 3.00) – you can have a beautifully crafted original design.
6. MINIMAL STORAGE SPACE:Since these are digital files they will take up very little room in your computer! As with all your computer files – just Burn the images to a CD or External Drive for safe-keeping.
7.YOU CAN USE FOR PERSONAL ARTS & CRAFTSwithout copyright restrictions. You may use the images in your individual personal arts and/or crafts – however, in most cases you may NOT share, redistribute, or resell the images (either digitally or in print) in original format, or as part of a digital collage sheet or scrap booking collection.
[Please check the individual sellers TERMS OF USE policies whether you may use the images to sell for a small profit].
I hope you have found this introduction to digital collage sheets useful and that it inspires you to try them out and experiment with them! Have fun.
Best regards and thanks for visiting!
- Daniel Montoya
Here is a simple and affordable DIY tutorial that anyone can do!
For this tutorial I will be framing a 4" x 6" inch Print.
Here are the materials you will need:
1. 11" x 14" or larger sized ready-made frame with 5" x 7" mat opening. (Mat should be acid-free).
2. Acid-Free Mat board for mounting work if not included with Frame.
3. Exacto or utility knife 4. Gummed Linen Hinging Tape (Acid-Free) 5. Ruler or straight-edge. 6. Pencil. 7. Scissors. 8. Cardboard or cutting mat to protect cutting surface.
STEP 1: If the ready-made 11" x 14" frame does not include a mounting board, then cut a piece of mat board to the same size with a utility knife and a ruler. Remember to protect the cutting surface.
STEP: 2
Then take the acid-free mat board and place it facing up on top of the mounting board.
STEP 3:
Take your 4" x 6" inch print or photograph and center in inside the 5" x 7" mat opening like so.
STEP 4:
With a pencil lightly mark the top left and top right corners on the mounting board.
STEP 5:
Place the mat board in a safe area for now. Then take the 4" x 6" image and turn it upside down facing you and align along the pencil marks so it is straight and parallel to the top and bottom of the mounting board.
Then flip the image so the backside is facing you.
STEP 6:
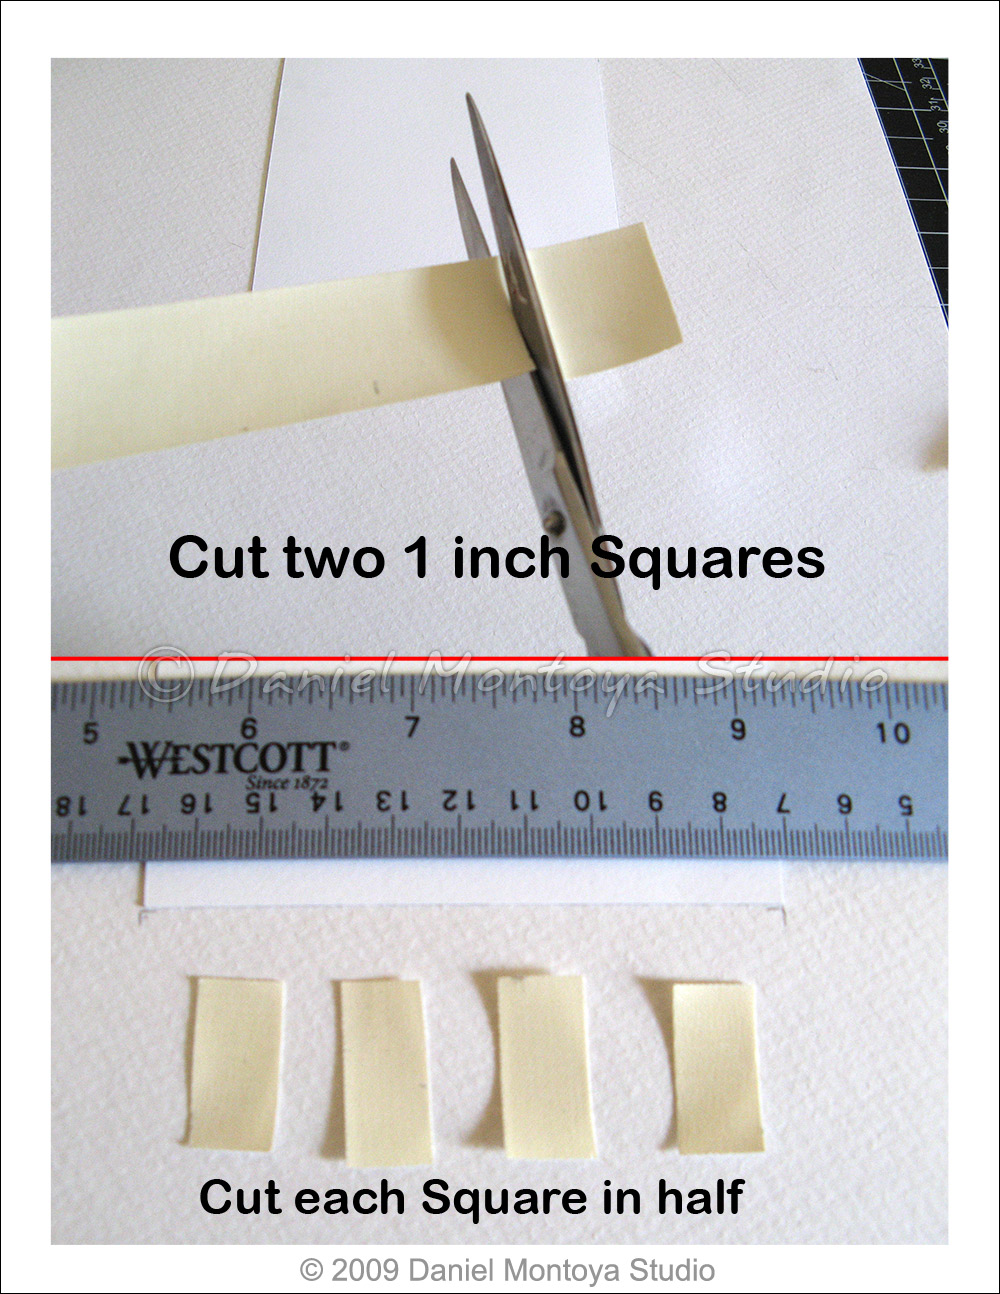
Cut a 6 inch piece of Gummed Linen Hinging Tape and measure two 1" inch marks on the backside with the pencil.
STEP 7:
Cut along the pencil marks to get two 1" inch Squares of tape. Then, with scissors cut each of the squares in half so you have 4 pieces of tape.
STEP 8:
Apply a little water to the gummed side of the linen tape and wait until it gets sticky. Then apply two pieces vertically 1/2 inch from the corners of the image, about 1/3 of the tape on the image and the rest on the mounting board. This attaches the image to the mounting board.
Then to reinforce the hinge apply the other two pieces of tape horizontally across the vertical pieces aligned with the edge of the image.
This creates a 2 standard T-Hinges, but since this hinge will be invisible when the image is folded over it is known as a V-Hinge.
STEP 9:
Erase any visible pencil marks with a kneaded eraser and then flip the image towards you and fold over the V-hinges.
STEP 10:
Image is shown V-hinged to the mounting board.
STEP 11:
Then flip the mat board on its backside and place it adjacent to the mounting board like so. Cut the remaining gummed linen tape in 2 pieces and attach the mat board to the mounting board creating a hinge.
STEP 12:
Fold the mat board over on top of the mounting board. Your work is ready to be inserted into the frame!
STEP 13:
Before you insert the mat board into the frame make sure that the glass is smudge and debris free. Clean the glass with a damp cloth and a little Windex and let it dry for a few minutes. Then place inside the frame and hang. Voila! That wasn't too bad.
I like this method of framing work because you can use affordable ready-made-frames and it allows the edges of the work to show.
This is useful if you have a work with small margins or you don't want a portion of the image to be hidden behind a traditional beveled mat. It also allows you to display work without the need to own a professional mat cutter to make beveled mats.
[If you want to use the traditional method which hides the T-Hinge behind the mat board, just follow the steps to create a T-Hinge, but don't turn and flip the image upside down in STEP 5. ]
ABOUT GUMMED LINEN HINGING TAPE:
Gummed linen hinging tape is a safe, water reversible, acid-free tape with a water activated adhesive. The adhesive dries strong and will not warp.
Your local Arts & Craft Store, Photography Stores, or Office Supply Store might carry this item.
I hope that helps. If you have any other questions don't hesitate to ask. I hope you have enjoyed this tutorial and you find it helpful. Thanks for visiting!
I've always admired dance, sports, acrobats, and the human body in various postures and states - not only because of the endless possibilities that it allows to play with form, but also because the figure is so able to translate energy and inner states of being. So naturally, while watching my wife practice her daily Yoga routine I took some pictures with my digital camera and thought how best i could capture this beautiful and dynamic form of exercise.
About:
I hope each Yoga Asana piece can serve as a good luck charm for a more wholesome and integrated life.
The circular designs are based on the idea of the Mandala. Mandala in 'Sanskrit' can be translated as "completion" and represents wholeness and how we are connected to the environment that surrounds us. In addition, the circles inside some of the figures suggest energy centers or "chakras" that run along the spine. I also used symbolic color harmonies to match the title of each piece.
To see the complete Yoga Asana series please visit my online studio at: DanielMontoyaStudio.com
This is a 2.5” x 3.5” inch Limited Edition ACEO Print from a Series of 10 Diptychs (Double-paneled oil paintings) titled “Inner Dualities”.
This is the third diptych in the series titled “Sacrifice & Hope”.
They are based on the idea that the essence of human life consists of opposite forces and inner states of being that need to be united within the human soul to move towards individual wholeness.
The subject matter in these pieces is mostly inspired by the human form, and include art history, portraiture, still life, nature, ordinary objects, and personal symbols. In addition, these diptychs use symbolic color and shapes.
To see all 10 Diptychs and learn more about them please click HERE.
Here is a simple and affordable DIY tutorial that anyone can do!
Here are the materials you will need:
1. 5"x7", 6"x8" , 8"x10", or larger sized ready-made frame.
2. Acid-Free Mat board.
3. Exacto or utility knife.
4. Four acid-free Photo-corners.
5. Ruler or straight-edge.
6. Pencil.
7. Cardboard or mat to protect cutting surface.
Use any ready-made frame that comes with glass/plexi and cut a piece of mat board (preferably acid-free) with a utility knife to the same size opening.
My personal preference is to use inexpensive thin black frames and a light colored mat (white or beige) as it seems to match well in various home decor environments; but it's really is up to your creative personal preference.
For this tutorial I used an 8" x 10" inch frame with a beige colored mat board.
STEP 1:
On the backside of the mat board measure 8" inches wide and 10" inches high with your ruler and draw pencil lines as cutting guides.
STEP 2:
Cut the mat board with a utility knife along the cutting guidelines using the ruler or straight edge.Remember:to use a piece of cardboard or foamboard underneath the mat board to protect the surface you will be cutting on.
STEP 3:
Take the 4 acid free photo-corners and place them snugly along the corners of your ACEO or work on paper. Using photo-corners allows one to securely display work without having to use harmful tape or glue adhesives. Also the work can be safely removed in the future.
STEP 4:
Take the mat board and mark the center on the displayable surface.
For an 8" x 10" mat board, the center would be 4 inches equidistant from the left and right sides and 5 inches equidistant from the top and bottom.
I use this technique so I can center mount the work properly on top of the mat board. If you rather just eyeball it - then this step is optional.
If for any reason the work needs to be re-centered and re-mounted on the mat board i've found you can still carefully and safely remove the photo-corners from the matboard.
STEP 5:
After you mount the work on top of the mat board it is almost ready to be inserted into the frame.
Before you insert the mat board into the 8" x 10" frame make sure that the glass is smudge and debris free. Clean the glass with a damp cloth and a little Windex and let it dry for a few minutes.
STEP 6 - FINAL STEP:
Insert the mounted work into the frame and hang on the wall. Voila!
There a unlimited ways to display art and 2D work, have fun with it!
With this technique you can mount more than one work and make interesting visual arrangements, like a diptych, triptych or create geometric shapes. Let your imagination run free. Enjoy!
ABOUT PHOTO CORNERS:
These are the photo-corners I use, made by Canson.
I would try to look for them in retail shops where you live first - it's not worth paying the online shipping for such an inexpensive item - Scrapbook - Photography Stores - Arts & Crafts stores and even Office Supply Stores might carry them.
I find photo-corners are a great way to preserve cherished art, memorabilia, and photographs.
I hope that helps. If you have any other questions don't hesitate to ask. Thanks for visiting!
Have you ever thought about why you gravitate towards working in certain media or materials?
1. What media or material(s) do you use? Do you work primarily with one media/material or do you combine or use several?
2. When choosing a media or materials what factors come into play when making your decision? (expense, ease of use, space requirements, audience, aesthetics, safety, etc).
3. Do you think the choice of materials says anything about how you approach your work?
While these 3 questions are basic, they are an interesting start in understanding the creative path and why one makes certain choices?
Please include a link to your work or website to share with fellow creatives. Thank you for your participation!
My answers:
1. I use oil paint. This is the primary material i use.
2. I use oil paint because it has a rich, creamy, and malleable texture and it doesn't dry readily and can be mixed while working. It does not need to be covered under glass if a varnish is applied and it can be applied to almost any prepared surface. Also, you don't need that much space to store it and to use it. It has a long life span once applied.
3. I think i use oil paint because i feel i am in control and can get the level of detail i need, you can work slowly at your own pace, and it is easy to set up. Being able to reproduce a range of colors by blending a few basic hues has always fascinated me.
My latest work in oils is a series of Still Life oil paintings.
I am attracted to still life because involves putting together an assemblage of household objects, color, and form into a thematic compositional arrangement.
In many of my still life paintings I use a glass of wine as the main character to personify the human spirit. In addition, I like the reflective qualities of glass and how it distorts shape, color, and light. I am also interested in the interplay of dramatic chiaroscuro (light and shadow) on shapes and objects.
A number of my still-life paintings are concerned with the simple joys of life, leisure, and contemplation.
For example "Wine Glass, Pear, and Pansy"- is concerned with nature and can suggest spiritual growth or ephemeral beauty.
"Liquor Glass and Pair of Dice" is concerned with leisure time.
It suggests the importance of fun and games or the random or not so random (roll of the dice) experiences in one's life.
In some of my still-life paintings I also allude to other artists or art forms to touch upon a specific theme.
For example in "Wine Glass and Michelangelo" I included two images to represent the cycle of Life and Death, represented by an urn inside a temple and Michelangelo's 'Creation' from the Sistine Ceiling.
These still life paintings are meticulously painted with fine haired brushes and take approximately 4 weeks to complete depending on the complexity and detail of the composition. They are painted on wood panel or art board to ensure the works longevity and they range in dimension from 8.5" x 10" to 20" x 16" inches.
ACEO stands for "Art Cards, Editions and Originals".
The standard format is 2.5" x 3.5" inches in dimension - the size of a sports trading card.
ACEOs can be either one-of-a-kind originals using various art media or can be made as ACEO limited edition prints.
These wonderful and affordably priced miniature works of art can be collected, traded for, or simply framed for display.
ACEO Limited Edition Prints
ACEO Print buyers and collectors appreciate the value of a limited edition, thus they are generally made in small editions [10-50]. In addition, they are customarily signed and numbered on the back (for example 1 of 50 or 1/50 for example).
All my ACEO Prints are printed with a Certificate of Authenticity on the back of the card and include the title, date, edition number/size, and signature.
They are printed on acid-free museum quality paper with highest quality archival inks.
My store for Greeting Cards, Glicee and Canvas Prints
My eCrater Store:
My Zibbet Store:
My ArtFire Store:
About Me in a few words:
Thanks for visiting my blog!
My name is Daniel Montoya and I am a self-represented visual artist and creative graphic designer living and working in Brooklyn, New York.
I offer Oils, Limited Edition Prints & ACEOs, Bookmarks, Pendantas, and artful Gifts on paper as well as Digital Designs for Arts & Crafts.
I love all things creative and blog about works in progress, creative inspirations, instructional techniques and tutorials, and anything related with visual, digital, and handmade art.


